Tuesday, October 28, 2008
Monday, October 13, 2008
Painting the studio
So I finally got around to painting my studio. It only took 3 years.
This is what it looked like.

The track lighting and ceiling fan were added over a year ago. The colors are Old Gold and Spice. Looks more like Poo and Pumpkin to me. I decided that I didn't like the plain, poo brown. So...

I added a sponged on gold metalic glaze. Here it is with and without the glaze.

And here's a closeup.

Done!

This is what it looked like.

The track lighting and ceiling fan were added over a year ago. The colors are Old Gold and Spice. Looks more like Poo and Pumpkin to me. I decided that I didn't like the plain, poo brown. So...

I added a sponged on gold metalic glaze. Here it is with and without the glaze.

And here's a closeup.

Done!

Saturday, June 7, 2008
The Wrister
On my trip to New Mexico last weekend, I picked up some qiviut yarn and a pattern to make wristers. The yarn is from Windy Valley MuskOx http://www.windyvalleymuskox.net/index.html The pattern is a bit confusing.

After you finish your 5 repeats and the next three rows, hold your work like this. You'll be working with the inside facing you.

This is after working row 4. You are not working in the round anymore, but back and forth. After every row, you'll turn your work. This creates the thumb hole.

After you finish your 5 repeats and the next three rows, hold your work like this. You'll be working with the inside facing you.

This is after working row 4. You are not working in the round anymore, but back and forth. After every row, you'll turn your work. This creates the thumb hole.
Monday, May 19, 2008
What I've Been Up To
Haven't been up to much lately.

Columbine

Flowering Almond

Tiarella

Practicing the Piano. This is the new one, which we got for Christmas. The old one is in pieces, but that's another story.

Working on the raffle quilt for my guild http://www.nlcqg.org/qs_2009/index.html This is a mock up.

A little applique. This is one of nine blocks that I've been working on for the last 3 years. You can see the others at http://keridesigns.com/pillows.php

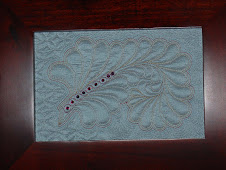
And last but not least, a little quilting.
A little gardening.

Columbine

Flowering Almond

Tiarella

Practicing the Piano. This is the new one, which we got for Christmas. The old one is in pieces, but that's another story.

Working on the raffle quilt for my guild http://www.nlcqg.org/qs_2009/index.html This is a mock up.

A little applique. This is one of nine blocks that I've been working on for the last 3 years. You can see the others at http://keridesigns.com/pillows.php

And last but not least, a little quilting.
Monday, May 5, 2008
Raffle Quilt Block Instructions
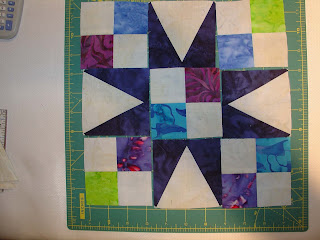
Northern Illinois Quilters' Guild http://www.nlcqg.org/ is constructing a raffle quilt. These are the instructions for sewing the two blocks.
FOUR PATCHES
You have 10 2" x 4 1/2" strips:
JACOB'S LADDER BLOCK
FOUR PATCHES
You have 10 2" x 4 1/2" strips:
5 Cream
1 Green
2 Blue
2 Purple
Match the cream with each of the colored strips.
Sew with a SCANT 1/4" seam allowance. Press the seam allowance towards the colored strip. Trim ends even, then subcut each into 2" sections.
You should have 10 2-patch units.
Sew these together in pairs to make 4 4-patch units. PLEASE use two different colors in each 4-patch. The 4-patch units should measure 3 1/2" square.
HALF SQUARE TRIANGLE
You have 4 - 4 1/2" squares:
2 Black
2 Dark Pink
Lay a pink square with the diagonal pencil line facing up on a black square. Sew a SCANT 1/4" seam on both sides of the diagonal line.
Cut on the line and press towards the black. Trim each half square triangle unit to 3 1/2" square.
PUTTING IT TOGETHER
Lay out units as shown. Make sure the 4-patch units have the colors going from bottom left to upper right.
Sew together into rows. Press seam allowance towards the 4-patches. Sew the three rows together, pressing the seams towards the center row. Your finished block should measure 9 1/2" square.
STAR BLOCK
FOUR PATCHES
Follow the instructions above to make the 4-patch units.
STAR POINTS
You have:
4 Cream background triangles
6 Dark Blue star points
Lay out the pieces as shown below.
Lay the left hand star point on top of the background triangle. The trimmed tip of the star point lines up nice and neat. Sew with a SCANT 1/4" seam allowance. Press seam allowance toward the dark blue star point.
Lay the right hand star point on top of the background triangle. Pinning will help you line this piece up correctly. If you have to stretch it a little bit, that's OK. Sew with a SCANT 1/4" seam allowance.
Press seam allowance towards the dark blue star point. Trim top and sids. Star point units should measure 3 1/2" square.
PUTTING IT TOGETHER
Lay out units as shown. Make sure the 4-patch units have the colors going from bottom left to upper right.
Sew together into rows. Press seam allowance towards the 4-patchs. Sew the three rows together, pressing the seams toward the bottom and top rows.
Sunday, April 27, 2008
First Post
Subscribe to:
Comments (Atom)


